Friday, 26 July 2013

Feature: DIY Nurturing hair mask by Luchessa

Hello and good day dear readers and friends of makeup-pixi3.  Hope you are all doing well and enjoying this summer day.  When Georgina offered me a spot on her lovely blog for a guest post, I didn’t have to think about it twice. So here I am, the writer behind {Beauty expression by Luchessa} - ready to present a simple, but very useful DIY tip.

Let’s see, if we can pamper and nurture your hair a little.  I’m sure everyone has heard about a honey & oil or even the egg and milk mask to make the hair smooth and the scalp very nurtured (especially after all that changing weather).  But what about a Kefir & Egg yolk & Olive oil?!


What is Kefir some of you might ask? Kefir is cultured, creamy product, which can be made from any type of milk, cow, goat or sheep, coconut, rice or even soy. It’s a great source of biotin and contains Vitamin B12, B1, and Vitamin K.

Besides being a great healthy & natural drink (similar to Ayran, Yogurt or Buttermilk), it’s also incredibly good for your skin and hair.

For this Hair Mask you will need:


- 100 ml (about 0.416 cups) of Kefir
- 1 egg yolk
- 3 tablespoons of olive oil

1) Pour 100 ml of Kefir into a small bowl (make sure it’s not coming right of the fridge)
2) Add egg yolk
3) Add olive oil
4) Stir until everything is mixed evenly
5) Massage the mix into your scalp first and then spread it over your hair
6) Coat your head with (a shower cap if you like) a towel and let it sit for 30 min
7) Wash everything off and condition as usual

pssst – can you see the crazy frog in this picture? ;)

The hair mask is really easy to make. Of course you can also use buttermilk if you prefer it or if it’s easier to get in your area.  Make sure to keep your hair warm and coated, while it’s under that towel and enjoy your nurtured and happy hair afterwards.  This is something I've been doing for years and it’s one of my go-to hair masks. Please let me know, if you tried anything similar or if you give the Kefir mask a go.

Don’t be shy and chat with me on Twitter or visit my newly self-hosted beauty & lifestyle blog: Luchessa.org

Have a wonderful day and happy pampering!!


This months Bigest-Pixi3 advertiser is the lovely Stacie from Life is worth the fight


SHARE:

Wednesday, 24 July 2013

Feature: 5 Homemade hair treatments

Having great hair usually means having great products and styling tools, but those things can quickly add up and before you know it you're broke (but at least your hair looks great, right?). Skip the store and leave your wallet at home, cause you can keep your wallet full and have great hair by making your own! In fact, you probably already have all of the ingredients you need living in your pantry! So save your money for great haircuts like the ones at Rush Kingston and leave the rest to your kitchen. Check em out!

Hair Repair Treatment:
A hair repair treatment is great if you're hair looking a little dry, dull or damaged. It's also great to do after a long winter or summer season. Give your hair some life with this recipe:

Ingredients:
1 Tablespoon Apple Cider Vinegar
1 Tablespoon Olive Oil
2 Tablespoons Honey

Directions:
Mix all ingredients together in a bowl. Apply directly to dry hair by starting at the roots and working your way down. Leave in your hair for thirty minutes, then rinse it out with water. Wash your hair with your favorite shampoo and conditioner.


Sea Salt Spray:
Sea Salt spray is a great way to give yourself that "just left the beach" look without ever coming close the ocean. The problem is, the good bottles tend to be fairly expensive. But luckily, there's no reason to break the bank when you can make a just as good spray at home.


Ingredients:

8 Ounces of Hot Water
4 or 5 drops of essential coconut oil
2 Teaspoons of Coarse Sea Salt
1 Teaspoon of Hair Gel

Directions:
Add all of the ingredients into a spray bottle. Shake until the salt has dissolved. Then spray into damp hair and scrunch it dry or apply to dry hair to give it that messy look.


Homemade Shampoo and Conditioner:
Using homemade conditioner and shampoo is a great way to save money and protect your hair from products that actually strip your hair of it's essential oils. Restore your hair's glory with these recipes.

Ingredients:
Shampoo:
1 Tablespoon Baking Soda
8 Ounces of Water

Conditioner:
1 Tablespoon of Apple Cider Vinegar
8 Ounces of Water

Directions:
Shampoo:
Pour into a new or clean empty shampoo bottle. Mix well. Apply to hair and massage into scalp for a minute or so. Shake well before each use. Follow with homemade conditioner.

Conditioner:
Pour both ingredients into a squirt or spray bottle. Mix well. Apply to hair and massage into scalp for a minute or so. Shake well before each use.


Heat Protectant Spray:
You should definitely consider using heat protectant spray if you use a lot of styling products like hair straighteners, curling wands and blow dryers, It not only makes styling your hair easier, it also protects it from heat damage!

Ingredients:
3 Tablespoons of Water
1 Tablespoon of Conditioner
2 Teaspoons of Hair Spray

Directions:
Mix all ingredients into a small spray bottle. Apply to hair before using any heat styling products. Use afterwards to help tame flyaways.


Shiny Hair Mask:
While some people are born with naturally shiny hair, most of us aren't, but that doesn't mean we can't fake it. Make a Shiny Hair Mask and watch as your hair glistens even when it's overcast.


Ingredients:
1 egg
1 Tablespoon Olive Oil

Directions:
Mix both ingredients together in a bowl. Apply to dry hair and let it sit for 15 minutes. Wash it out with cool water (to avoid cooking the egg!) and then shampoo and condition as you usually would.

Melissa is a Rush Hairstylist and active do-it yourselfer, who's always looking for the next best recipe.


This months Bigest-Pixi3 advertiser is the lovely Stacie from Life is worth the fight


*
SHARE:

Wednesday, 26 June 2013

Feature - Megan Fox - Steal her makeup look

Megan Fox natural makeup

When it comes to hair and make-up, Hollywood actress and all-round goddess Megan Fox always looks absolutely flawless. There are ways to nail her smouldering sex bomb look that might involve having a nose job or Botox injections; but how does she do it?

Here are a few tips and ideas to help you steal Megan Fox’s make-up look for yourself:

Sometimes all you need is a pair of fake eyelashes. Whether you pile on lashings of mascara or use a pair of false eyelashes, sometimes glamorous eyes are all you need to create a stunning night-time look. This is one of Megan’s favourite looks, where apart from a slick of lip gloss, she lets her baby blues do all the talking.

Definition is everything. Megan is hardly ever seen in smudgy kohl make-up or roughly stained lips – her make-up look is very neat, with cosmetics used to define her features very carefully. Eyebrows have not a hair out of place, lip colour is very precise and even her blush is used in exactly the right spots to bring out the lines of her cheekbones.

Fuss-free hair. Megan Fox hardly ever goes in for elaborate hair styles with lots of detail. Instead, she seems to prefer a fuss-free look which is always pretty but never overdone, from flowing beachy waves to a simple, slicked-back ponytail.

Glossy lips are a must. When she’s not rocking a Jessica Rabbit look with vampy red lipstick and curves that send women rushing to breast enhancement clinics in their thousands, the actress loves to keep things simple yet luscious with a pink glossy lip. Teamed with bronzy eyeshadow and peachy cheeks, the look is glossy, glowing and super glamorous.

Megan Fox with red lips

Emphasise those brows. One of the most noticeable things about Megan’s beauty look is her well-defined and fairly prominent brows. These perfectly shaped beauties, with their face-flattering, eye-opening arches and subtly filled-in shape, are what give Megan her glamour. So, if you have a strong brow, don’t be afraid to show it off – just remember to keep everything neat and perfectly groomed.

Perfect that over-the-shoulder pose. Now that you’ve pinched pretty much all of Megan Fox’s make-up secrets, you can now start practising your best smouldering Megan Fox pose. She loves a seductive over-the-shoulder glance, but you might need to put the hours in to copy it spot-on.


Bella Franklin is a style and beauty writer, offering advice and tips to help achieve the latest trends and looks. If you want to catch up with Bella to ask for tips or to even ask advice on the latest cosmetic surgery treatments such as breast enhancements, you can find her on Twitter at @cosmetic_bella


This months Bigest-Pixi3 advertiser is the lovely Shang from The Feminine Crusade


*sponsored post
SHARE:

Friday, 14 June 2013

Guest writer - Iheartmexo - Neutral nail polishes

Hey everyone!

I am Hareem and I write about beauty and fashion over at Iheartmexo. Georgina has kindly let me guest post for her today which I am so excited about as her blog is lovely (as you guys may know!).

I decided to do a post on my top neutral nail polish picks. You can even say nude polishes.

I personally love neutral nail polishes as much as I adore my vibrant ones. But you gotta love neutral colours. They look great on everyone and are quite 'easy' to wear to I guess. I picked out 6 of my favourite ones. All the nail polishes are really affordable as well, look great and apply well too.


First up is a firm favourite of mine. When I don't know what to apply on my nails without a doubt I simply pick out L'Oreal's Macaron Noisette which is a pretty nude that has shimmer running through it. It's from their colour riche line which is also a favourite of mine. It's a very soft nude and looks beautiful.

ELF's Nude is also a great neutral colour. It's quite sheer so you'll need a few coats but once applied it gives that French manicure look which I personally love as it makes your nails look healthy and natural.


Angelica nail colours have a great variety of shades and types. One that I quite like is their satin matte effect nail polish in Au Naturel which is a light beige colour. It dries matte just like the Barry M nail textures minus the gritty texture and looks really lovely. I love adding glitter on top of this to make it a little more fun.

Boji by Maxfactor was a limited edition nail polish but it's still available online. This is more of a darker neutral shade. You need about 3 coats to make it opaque but what I love about it is that it has a mauve tinge to it which makes it look great on everyone.


AKA cosmetics is a label I love! They have lovely products which I really recommend. Their nail polish in Mocha is well loved by me! It's a lovely dark taupe colour and is opaque in 1 coat.

The very famous, Mushroom, by Barry M has also made my top neutral list. This is a brown but it's alot more than just a brown. It's like soft brown I guess but what I love is the formula and how in simply one coat it looks lovely! I am sure every blogger has this shade! If not, you need it! :)

These are my top neutral nail polish picks and I hope you enjoyed my post! I would love to know your favourites. Thankyou Georgina for letting me guest post on your blog!

Hareem x

A big thank you to the lovely Hareem, be sure to check out her lovely blog here.


This months Bigest-Pixi3 advertiser is the lovely Shang from The Feminine Crusade

 
Written by Georgina Kent
SHARE:

Thursday, 13 June 2013

Guest writer - Some sparkle and sunshine

If I could only hold onto one item from my makeup collection, it would have to be mascara. It does so much for my stubby, blonde lashes that I just wouldn't be without it.


Because of my love for the stuff, I have quite the collection. Some are terrible, some are okay but there a few stand outs in there and I wanted to share those with you today.  So, without further or do (and in no particular order), I give you my top 5 mascaras at the moment.

1. Maybelline Mega Plush Mascara, £7.99


The mega plush mascara is the newest offering from Maybelline, and it's a good one! The bristle wand captures all the lashes when you apply it, and you can really work the mascara from root to tip. It's buildable, long lasting and great for the top and bottom lashes. The first coat gives a more natural look while the another coat or two really gives the lashes some omph for a more dramatic look.  

2. B. Loud High Volume Mascara, £9.99

The B. Loud High Volume Mascara* is a lovely 'tube' mascara. It's a lovely deep black colour and in just one coat it gives me well coated lashes. The huge wand can be a little intimidating at first, and it's not ideal for the bottom lashes, but it does mean you can apply it quickly and build up volume easily. It does need a good two coats to really give your lashes a boost, but it lasts all day after application without smudging. It's easy to remove with just some water and a cotton pad.

3. Seventeen Doll'd Up Mascara, £6.29


The Seventeen Doll'd Up Mascara is fast becoming a favourite of many people. It's a dupe for the Cover Girl Lash Blast Clump Crusher mascara, and it's cheap too. The spoon shaped, plastic wand is great for coating all the lashes without clumping.  It lasts ages on my lashes, and holds a curl really well.

4. Lancome Hypnose Star Mascara, £22

I adore this mascara. It's  one of the few mascaras that I've ever repurchased, and I can't see me being without it any time soon. It does everything I want a mascara to do and more. It lengthens, curls (and hold it) and volumises my lashes. It lasts all day without any smudging or flaking, but in-spite of the long wearing properties, it's easy to take off at the end of the day.

5. MUA Waterproof Mascara, £1


The MUA Waterproof Mascara is my favourite bargain mascara. I'm not going to lie and say it's the best thing since sliced bread but for only £1 it's pretty close. It's a beautiful lengthening formula, with small fibers to lengthen lashes even more. It takes a few coats to get volume, but it dries quickly on the lashes so it's quick to build up coats. It's a decent waterproof formula, and lasts up well through some tears and the rain.The simple wand and no frills packaging means it's not the pretties thing out there but the formula is better than some of the more expensive mascara so it's 100% worth a try if you can get your hands on it.

My Links: 

My Blog: http://www.somesparkleandshine.blogspot.com
Bloglovin: http://www.bloglovin.com/sparkleandshine


This months Bigest-Pixi3 advertiser is the lovely Shang from The Feminine Crusade

 
Written by Georgina Kent
SHARE:

Wednesday, 12 June 2013

Guest writer - Daisy Dreams - The french manicure is back

The french manicure is back! (again) it makes a refreshing change from all the crazy nail art that has been sported so far this summer. The french manicure like the name suggests is 'French' but us Brits changed it up a little bit and made it look rather tacky and less parisian chic. I'm not talking about thick white tips and nails that are so long you physically can't do anything, i'm talking pushed back cuticles, pale nails and a quick white line with a pencil. This look is effortless and never really goes out of fashion.


After prepping your nails and cutting them down to what feels best for you, get some cuticle oil/balm (I use some by Burts Bees) and push your cuticles back, leaving a very clean looking nail. Then you need a clear or translucent base coat, I love 'Save The Nail' Ridge Filling Base Coat available from Boots for £5.95. It gives the nails a really smooth look, especially after the amount of glitter I have had on them they needed a bit of TLC.

I do one quick coat and it dries in about a minute. Although it looks pink in the bottle it comes out clear with a pink tint in the sun light. Next I have used Chanel's 331 Allegoria as the colour, again I just do one coat of this as I don't want the colour to come out too strong. I love Chanel nail polishes, although they are expensive I think they are worth the hefty price tag, I have had this polish for quite sometime and I am super impressed that it hasn't gone 'gloopy' and thick.

I always use a top coat to give the nail a really glossy finish, I have used 'Save The Nail' Wet Look Top Coat available from Boots for £6.95, it gives the nail a beautiful finish, and stops chipping brilliantly!! If I am in a rush I will finish my nails off with Sally Hansens 'Dry Kwik' nail drops, you only need to dip the brush in once to do one hand, and once more again for the other hand, a little goes a long way. With the drops on it will take less than five minutes for my nails to be done.


Lastly, when my nails have dried, I get my 'Nail White Pencil' from Rimmel London, which is available at Boots for only £2.99, and push it quite hardly under my nails to make sure the white colour comes through. I absolutely love this product, as you can pop it in your handbag and just top up your nail tips on the go. I do find that I have to do this every other day otherwise the colour doesn't last.

I hope you have enjoyed my guest post, for more of reviews and what not follow me over on Bloglovin' http://www.bloglovin.com/blog/4820945

Thanks to Daisy for writing this lovely post - hope you all enjoyed it :)  You can find her lovely blog here.


This months Bigest-Pixi3 advertiser is the lovely Shang from The Feminine Crusade

 
Written by Georgina Kent
SHARE:

Tuesday, 11 June 2013

Guest writer - Beauty Bird | Sleep easy pamper

Today's guest post is from the lovely Beauty Bird and it's all about a sleep easy pampering :)

Do you sometimes have those days, weeks or even months where you just feel stressed and tired from work, school or from issues going on in your personal life? I know I do. Whenever I’m stressed out I find it really hard to sleep, which stresses me out even more… a very vicious cycle! I thought I’d share with you my “Sleep Easy Pamper”, which really helps me to switch off from the events of the day and treat myself to some me time. I can be really neglectful of myself sometimes – other things tend to take higher priority.

Products to help you sleep

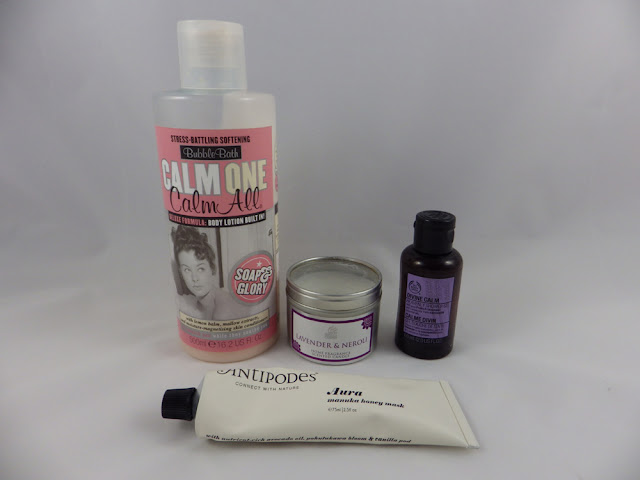
The one thing that is guaranteed to relax me is a good, old bubble bath. I don’t have a long soak in the tub very often, so it’s a real treat for me! I tend to reach for Soap and Glory Calm One, Calm All bubble bath, which is described as “a stress-battling, softening bubble bath”. The formula is thick, creamy and luxurious, with built in moisturiser and the lovely Soap and Glory fragrance. Alternatively, Lush’s The Comforter Bubble Bar is another bathing beauty; it has a gorgeous berry scent and plus, who can resist a pink bath?! Once the bath is running I’ll light a candle, such as the beautifully scented Shearer Candle in Lavender and Neroli and pop on a face mask. I’m currently in love with the Antipodes Aura Manuka Honey face mask, which is super hydrating but thanks to the honey, is great for blemishes too. I prefer not to use too many other products and just simply lie back and relax, but when I do I’ll reach for The Body Shop Divine Calm Heavenly Shower Gel, which contains soothing lavender and chamomile essential oils.


Text saying Sleep Easy

Once I’m out of the bath, I’ll pour myself a cup of Clipper Organic Sleep Easy Infusion. I absolutely love this tea! It helps promote and maintain a healthy sleep, containing cinnamon, chamomile, rooibos, lemon balm and valerian root, with natural orange flavouring. I love the taste and within the hour I feel seriously sleepy – I highly recommend! Armed with my drink, I’ll snuggle up with a good book. I’m currently reading Shopping, Seduction and Mr Selfridge- which is essentially a biography of his life- after loving the TV series. I find that reading really transports me somewhere else, but if I still happen to have any nagging thoughts whirring around in my brain I’ll get out my notepad. Writing down my thoughts is so therapeutic; I try and imagine the thoughts floating out of my brain and onto the paper. Sounds a little silly, but it really works and helps to clear my mind!

Finally, if I feel I need to, I’ll rub a little of the 100% natural Badger Sleep Balm onto my temples and wrists. I find the lavender and bergamot scent really soothing and relaxing… zzzzzzzz!

Do you have a routine for a Sleep Easy Pamper? I’d love to hear it!

Beauty Bird xx

n.b. Thank you so much to the lovely Beauty Bird for writing this post for me, be sure to check out her blog here.


This months Bigest-Pixi3 advertiser is the lovely Shang from The Feminine Crusade

 
Written by Georgina Kent
SHARE:

Monday, 10 June 2013

Guest writer: One Little Vice | The Beauty Audit


Hello! I'm Angelica and I write a beauty blog called One Little Vice. Georgina's very kindly let me guest post for her and today's post is my beauty audit.

If any of you are magazine readers you may have seen 'The Beauty Audit' feature that InStyle ran a couple of months ago. It was a fascinating piece, especially for a beauty junkie like me. It gathered together four women who worked for InStyle and tallied up how many beauty products they used on a daily basis - it was essentially the beauty equivalent of a food diary. The results were really interesting and it really highlighted just how much stuff gets patted, slathered and buffed onto most women's skin every day. It's been a long time coming but I knew that I wanted to do a post of this nature eventually and now is my chance. Below is an image of all the products I used on one, very normal, day (Thursday 6th June, for those interested).


The Body Shop's Cool and Creamy Wash (£5), Soap and Glory Sugar Crush Body Wash (£6), Naked Strength Renewing Shampoo (£4.19), Moroccan Oil (£12.85), Nivea Sensitive and Pure Deodorant (£1.64), L'Occitane Shea Ultra Gentle Moisturiser (£25),  L'Occitane Angelica Ultra Matte Fluid (£26), Hydraluron (£25), Bioderma Sensibio H2O (£3), The Body Shop's Aloe Calming Toner (£8),  L'Oreal Lumi Magique Primer (£9.99), Dior Nudeskin BB Cream (£25), L'Oreal Illuminating Touch (£8.19), Rimmel Wake Me Up Concealer (£5.49), Rimmel Wake Me Up Shimmer Touch in Shimmering Sand (£4.99), The Body Shop Lip Butter (£4), Dainty Doll Cream Blush (£2), Rimmel Eyeliner (£3.99), The Body Shop Brow Definer (£8), Maybelline Color Tattoo in On and On Bronze (£4.99), Mac Lipstick in Vegas Volt (£14), Benefit They're Real Mascara mini (£9), Nip Fab Shine Make-up Fix (£9.95), Bioderma Photoderm SPF Matt SPF 30 (£13.70), Garnier Ambre Solaire Sheer Protect SPF 30 (£12.49).

25 products, totalling £253.46

I knew I was going to be surprised but I didn't think I was going to be as shocked as I was when I added all of the products up. There are a couple of things that I feel like I learnt just from taking a moment to look at my beauty usage this closely. Firstly, we have to start with numbers; twenty five products and £253.46. Both those numbers seem so high, I had no idea quite how much money it all costs and I certainly had no real idea that I used so much on my skin every day and. I think this brings me to the main lesson that I've learnt from this close analysis.

Everything we use on our bodies is part of a big cocktail of products that forms our beauty regime and the less chemicals or 'bad' ingredients (whatever you might personally hold those to be) is probably going to be better for us in the long run. I might like to argue that the total of my day's products is so high because I've chosen high quality products but I can see where I've skipped corners (that Nip Fab Shine Make-up Fix is a less effective, chemical ridden replacement of a product I loved from The Body Shop) and I can see where there's room for improvement (maybe I should use a deodorant that's free from aluminium, for example).

It's also been a wonderful exercise for pinpointing any products that might be past their use by date, for example I'm sure that my L'Oreal Lumi Magique Primer is more than a year old, as is my Garnier Ambre Solaire Sheer Protect SPF 30 (SPF degrades so should be replaced each year). Taking stock of what you use, like I've done today, is a real eye opener. I don't think it's necessarily meant to shame you into using fewer products, rather, it's purpose is to open your eyes to what you use and re-assess what your version of 'normal' is. The products I've listed in this post is what I would consider to be my normal every day beauty useage and if I can make even the slightest improvements then every single day I'll be reaping the benefit of these changes.

I hope you enjoyed this post, writing it was a really great experience and I have to say a big thank you to Georgina for letting me write it for her! I'd love to know what you think about the number of products I use and about the amount they cost, do you think that I use a crazy amount or do you perhaps you more?

Thank you Angelica for writing this awesome post :) Make sure you go and visit her lovely blog here :)


This months Bigest-Pixi3 advertiser is the lovely Shang from The Feminine Crusade


Written by Georgina Kent
SHARE:

Tuesday, 4 June 2013

Feature - Festival hair

You’re going away to a festival for the weekend and you want to look your best, but a decent shower is hard to find at a festival, and there’s much better things to be doing than washing your hair anyway! So here are some top tips in order to make sure your hair still looks great the whole weekend:


The night before you leave, give your hair a wash using intense moisturising conditioner, tong your hair in order to build volume and shape and try to leave your hair as big as possible without using too many products- it will naturally settle and become more manageable over the next few days. You could also try some temporary pastel dip dying to make your hair really stand out over the weekend.


Whilst at the festival, plait your hair before going to sleep to keep a curl and avoid frizz. In the morning, turn your hair upside down and spray salt spray or hairspray at the roots. Shake your hair through, toss it back and you'll have naturally looking wavy hair for the rest of the day.


The number one product you're going to need over your festival weekend is dry shampoo- it adds texture and builds volume at the roots, disguising any greasiness. But be careful not to use too much! If for some reason all the shelves are clear of dry shampoo, then talcum powder will also do the job. You're also probably going to need a tangle teezer to help sort your hair out in the mornings! Avoid using any oil based hair products, your hair will have plenty of natural oils secreting anyway so you don't want to add to it. You also want to try not to touch your hair throughout the day, as all the dirt on your hands will be passed to your hair, making it greasier even quicker.


To help draw attention away from greasy hair, accessories are a must. The top festival hair accessory is of course the floral headband- it can act as a focal point so as to distract from your roots, and can be paired with plaits, such as a loose fishtail, to give you a whole new hairstyle. Other top festival hair accessories are hats (to hide your entire head of hair, if it really gets too much), bows (to hide problem areas of greasiness) and head scarves (to tie into your hair, keeping it half hidden, whilst still looking good).


On the very last day you can put your hair up into a fashionable messy bun, using hair grips and a hair doughnut- this will ensure you can enjoy your last day at the festival without worrying about how greasy and lifeless your hair is looking. Of course, the most valuable piece of advice is watch out for any drinks (or any other more questionable liquids) being thrown over your head, if they land in your hair then there’s not a whole lot you can do to fix it!

Author Bio:
Milly O’Sullivan is a hairdresser and blogger from England. Her interests include fashion and dance music. For all your hair styling needs, Milly recommends The Chapel

What's your favourite way to wear your hair at a festival?


This months Bigest-Pixi3 advertiser is the lovely Stacie from Life is worth the fight

 
Written by Georgina Kent
SHARE:

Saturday, 11 May 2013

Feature: Top ways to make your eyes stand out

Eyes are one of the first things a person notices, and are usually one of the first things people receive compliments on. Here are some ways to make your eyes stand out and your eye color pop.

Get Your Beauty Sleep - Running on only a few hours of sleep takes a toll on your whole body, especially your eyes. A person that is sleep deprived will have puffy eyes that look red and tired, which is never an attractive look. Make sure to be well rested, and your and body and your eyes will thank you.

Eye drops - If you wear contacts or your eyes frequently get red, carry eye drops with you. Red eyes can be sore and look unappealing, but eye drops can instantly clear up any redness. Eye drops are also ideal for dry eyes since the constant rubbing can create redness to the eye.

First, Put on Concealer - Concealer is great for evening out the skin tone under the eyes and smoothing out under-eye lines. Many concealers offer SPF, therefore protecting the delicate skin under the eyes from sun damage.

Next, Use Eyeliner to Line Eyes

Eyeliner is great for creating a dramatic look and truly making eyes pop. There are a wide variety of eyeliner colors that can create different looks and play up different eye colors. When using eyeliner, do not line the entire eye for this can make the eye look smaller. Instead, line from the outside of the eye, and stop a little more than halfway from the tear duct. For an everyday look, choose to line just the top lashes, and line the bottom lashes when going out for a more dramatic look.

Use Eye Shadow to Create Your Look

Different eye shadows can bring out different colors of the eye, and really make the eye stand out. Before putting eye shadow on, apply a primer to your lid to ensure the shadow stays in place all day. For a more sophisticated look, apply a bone color shadow to just the inner corners of your eye to draw attention to your eyes. Using light colored eye shadow can make eyes look bigger and wider. Eye shadow should match well with your skin tone, so if you are not sure which colors work for you then ask a beauty consultant before purchasing.
Next, Frame Eyes with Mascara- Mascara is a makeup product that most women swear by, for it frames the eyes and really draws attention to their shape and color. There is an assortment of mascara colors to choose from, but the go-to color is black since it looks good on everyone. Apply two to three coats, allowing each coat time to dry before applying the next. Avoid putting mascara on the bottom lashes for it will smudge and be tough to clean up.


Curl Your Eyelashes- Curl your eyelashes after you let your mascara dry. This will help the curl last longer and also allow you to decipher how much of a curl you want. Curling your eyelashes creates a wide-awake look, and it is an essential beauty tool.

Bio: Nancy Miller is a Senior Writer for Fashion TV and loves to write and research topics about fashion and beauty. She spends most of her time trying to understand what makes women feel beautiful.


This months bigest pixi3 advertiser is the lovely Laura from A Scottish Lass


 *This is not a sponsored post
SHARE:

Thursday, 4 April 2013

Feature: Spring / Summer Makeup Trends


THE EYES HAVE IT

Luxe Models’ UK's favourite make up look for spring/summer 2013 was on the Chanel runway. Sporting a strong wash of silver across the eyes and framed with feline liquid eyeliner, the eyes became the focus. It was a look repeated in various forms on multiple catwalks. At Versace and Gucci eyes were awash with bronze, whilst at Chloe they were copper. With such a strong metallic across the eyes it is important to pare back the rest of the look keeping hair simple and lips nude.

Christian Dior had the most interesting variation on this look. Using a bright wash of colour across the eye as a base, coloured Swarovski crystals were then applied across the lids ornately.  Again the rest of the look was bare and minimal and the lips nude.

NEON BRIGHTS

Bright colours and even neons are set to be a cheery spring/ summer trend. Luxe Models UK particularly loved the neon pink lip sported on the Giles Spring/Summer 2013 catwalk. So that the lip remained the focus the skin was kept pale and interesting yet dewy.

When playing around with neons and bright colours have fun but be sure to keep the focus on one area only. Another great look to be seen is that that was recently on the Michael Kors catwalk, where neon bright colour was applied in a line across the crease of the lid. Again the rest of the look was minimal.

The make up at Donna Karan brought further pleasant surprises. Eyes were awash with pink and lashings of pink mascara. It was very feminine and ethereal.


NUDE

Fresh dewy skin, nude lips and barely a hint of blusher was the fresh faced look at Alexander McQueen, Rick Owens and Marni on the Spring/ Summer 2013 catwalks. It's a far cry from TOWIE. There were no fake tans on these catwalks! If you love minimal make up then this spring/summer will be your chance to experiment with all of the latest BB and now CC creams coming onto the market. Loaded with SPF they are the perfect products to achieve the no make-up, make-up look.

SWINGING SIXTIES

The re-emergence of sixties make up was shown on the catwalks of Louis Vuitton, Marc Jacobs, Moschino and to a lesser extent Dolce and Gabbana. At Marc Jacobs the models had a banana shaped line of shadow applied to the crease of the lids and dark liner applied around the eyes for a very sixties look. Again at Louis Vuitton the eyes were feline and sporting skin with the well a powdered velvety finish that is synonymous with the sixties.

The rise of Cara Delevingne to supermodel status has also drawn the world’s attention back to the eyebrow. The brows were sculpted and filled in and very much accentuated on the Louis Vuitton and Marc Jacobs catwalks for Spring/ Summer 2013.

This article was brought to you by Luxe Models London


This months bigest pixi3 advertiser is the lovely Laura from A Scottish Lass,
And be sure to check out my lovely middle-pixi3 advertisers who this month are Sarah from Life in a Breakdown and the lovely Luchessa from Beauty Expression by Luchessa - be sure to head over to check out their beautiful blogs <3

 *sponsored post
SHARE:

Thursday, 28 March 2013

Feature: How to achieve smoky eyes

There’s no denying that a sultry, smoky eye looks hot. Best done in the evening, the smoky eye can dress up an outfit and add a dramatic take on otherwise simple looks. The question is: how do you achieve this look without looking like you have done ten rounds in the ring with Mike Tyson?


Start by prepping the skin with a primer and then apply your foundation as you would for the daytime.
Next, use an illuminating pen such as Touch Éclat well below the eyes around the sockets. Make up guru, Charlotte Tilbury, advises that many people make the mistake of taking this too close to the eyes, which makes them look tired. You can also use the illuminating pen to highlight the top of the cheekbones and down the bridge of the nose.

Before you add colour to the eyelid dust translucent powder under the eye with a big powder brush to
catch any falling shadow. Using a black or grey pencil liner, trace your top lash line from the inner corner to the outer. Then, use the same pencil to dot between your lower lashes. Using a cotton swab or an eyeliner brush smudge both lash lines.

Dust a light neutral shade of eye shadow across your brow bone below the eyebrow.
Sweep powder shadow, brown or grey, over your lid and into your crease, blending the colour up and
outward. After doing the initial blending, dip your eye shadow brush in a drop of water and using a more shimmery eye shadow, apply a little to the middle of the lid blending carefully. This will prevent colour from fading and give your lids a lovely shimmer.

Use an eyelash curler at the base of the eyelashes and then finish off with two coats of black mascara. A
lovely extra is to add a few individual eyelashes to the top lash line in the outer corner of the eye.
Always be wary of the makeup artist’s golden rule: only accentuate one area of the face. If you are doing a smokey eye it looks much better to keep the lips close to nude and the cheeks a neutral shade.

This article was brought to you by Luxe Models.


This months bigest pixi3 advertiser is the lovely Laura from A Scottish Lass,
And be sure to check out my lovely middle-pixi3 advertisers who this month are Sarah from Life in a Breakdown, Angelica from One Little Vice, Fiona from La Belle Dame Sans Merci, and Sally from The Human Mannequin, and the lovely Luchessa from Beauty Expression by Luchessa - be sure to head over to check out their beautiful blogs <3

  *sponsored post
SHARE:

Thursday, 7 February 2013

Feature: Korres Lip Butter in Jasmine

Hi! I'm Shona from freshbeautyxox but today I'm guest blogging for the lovely Georgina. I hope you enjoy my post all about my new lip balm love.

Last month I finally purchased possibly the most talked about Korres product. I hoped for great things to come out of this pretty little pot, especially as it costs around £6.


Korres claims that this buttery lip balm will melt onto your lips and offer a shiny, tinted finish. This lip butter is full of Shea Butter and Rice Wax which creates soft and hydrated lips. A big bonus about them is that they aren't sticky at all, in fact they are the softest lip balms I have come across!

These Lip Butters are also free of Mineral Oil , Silicone, Propylene Glycol and Ethanolamine.

I have the shade Jasmine which is one of the more nude shades they offer. Looking back I do wish I purchased a dark/brighter shade. The other shades on offer are:

Pomegranate
Quince
Guava
Wild Rose
Mango
Plum


Being quite a neutral shade it doesn't offer too much of a tint but it almost boosts my own natural lip colour. It also creates a beautiful shine.

More importantly though this lip butter feels heavenly on my dry and moisture craving lips. The product is quite soft in the pot and this transfers onto your lips making them feel very soft and hydrated. They aren't healing though so if your lips are very chapped you can't turn to these to heal them. These are good for keeping moisture levels in your lips up.

I can definitely see why these are so hyped up, I'm looking forward to purchasing another shade after my Spending Ban has finished.

I really would recommend these and you can purchase them from feelunique (free delivery!) and they range from £6-£7 depending on which shade you buy. However you can also buy these in stick form, this is great as I know some people aren't fans of dipping their fingers into pots to fish out lip balm.

Do they take your fancy?

Thanks for reading,
Shona x

freshbeautyxox.blogspot.com

Thanks to Shona for writing this lovely guest post for me :)  This is the shade I've been wanting to get for a while now, it's definitely secured it's place on my wish list for the end of my spending ban :)


This months big pixi3 advertisers are the lovely Laura from A Scottish Lass, Tasha from Belleza Kisses, Gem from Miss Makeup Magpie, Luchessa from Luchessa, Sally from The Human Mannequin - be sure to head over to check out their beautiful blogs <3

 
SHARE:
© Makeup-Pixi3. All rights reserved.
BLOGGER TEMPLATE DESIGNED BY pipdig